Cherry is beloved by woodworkers and woodcarvers for a number of reasons. Relatively affordable and easy to find, cherry has rich and vibrant colors and doesn’t need a lot of “doctoring” to finish beautifully.
Cherry wood is one of the easier hardwoods to carve. Sitting somewhere between softwoods (like pine) and harder hardwoods (like oak), cherry isn’t going to “melt like butter” when you put your carving tools to it. But it’s not going to be very hard to work with, either.
To learn more about carving cherry check out the rest of the inside info we share below!

Is Cherry Wood Good for Carving?
Pros of Carving with Cherry Wood:
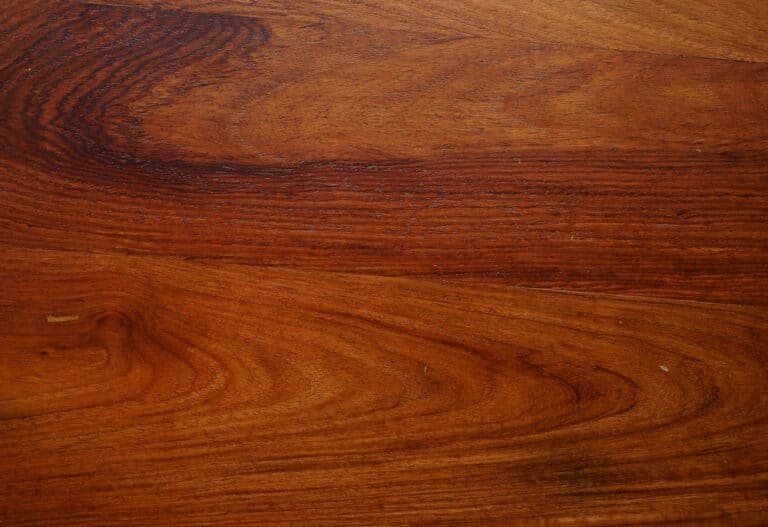
- Grain: Cherry wood has a fine, straight grain that can produce smooth, detailed carvings. It’s predictable and doesn’t have many knots, which is ideal for carving.
- Hardness: Cherry is a hardwood, but it’s not as hard as maple or oak, making it easier to carve than these harder species.
- Color and Aging: Cherry wood is known for its rich, reddish-brown color that deepens with age and exposure to sunlight, giving carvings a beautiful and luxurious appearance over time.
- Finish: It takes finish well, allowing for a variety of finishes that can enhance the natural beauty of the wood.
- Stability: Cherry wood is known for its stability once dried, meaning it’s less likely to warp or change shape, which is crucial for the longevity of a carving.
Cons of Carving with Cherry Wood:
- Cost: Cherry wood is more expensive than many other types of wood, which can increase the cost of carving projects.
- Workability: While softer than many hardwoods, cherry can still be challenging to carve, especially for beginners. It requires sharp tools and a bit of experience to manage effectively.
- Burning: Cherry wood can burn when being worked with high-speed tools, so care must be taken to avoid this, especially during detailed work.
- Sapwood: The sapwood of cherry can be much lighter than the heartwood, which may not be desirable for some projects and can limit the usable area of the wood.
- Allergies: Cherry wood dust can cause allergic reactions in some people, so proper protection like dust masks should be used when carving.
About as balanced a hardwood carving option as there is, cherry wood might not be the first material you’ll want to reach for if you’re just getting started in the world of wood carving. But it doesn’t require a lot of skills, a lot of specialized tools, or a lot of experience to work well, either.
Carvers of every skill level can coax some pretty beautiful projects out of cherry that has had plenty of time to dry and stabilize (more on that in just a moment).
Sure, you’re probably going to want to start your wood carving adventures off with something a little easier to work with – something in the softwoods family (like pine or basswood).
But it’s not going to be very long until you’re ready to jump up to the big leagues of hardwood with cherry, either. Cherry is a gateway into the more difficult hardwoods such as Oak.
| Cherry Wod Characteristics |
|---|
| Fine, straight grain |
| Moderate hardness |
| Rich color that ages well |
| Takes finish well |
| Stable when dried |
Why Cherry Wood is Good for Carving
Uniform Grain Patterns
The uniformity of the grain patterns in most cherry wood makes it a lot easier to work with than other hardwoods.
Other “fruiting” hardwoods – like apple wood, for example – can have highly regular grain patterns that make them a nightmare to work with carving tools.
You want straight grain, you want clean and clear grain (as much of it as possible), and you want a predictable wood structure that response to your carving tools the way you expect.
Cherry delivers all of that for you!
Solid, Stable Hardwood
Another reason to like cherry as a wood carver is because of this material’s solid and stable nature.
Woodworkers are most often going to be working with the lighter sapwood of a cherry tree (the outermost wood material) or the heartwood that is a little stiffer, a little darker, and a little harder.
Either of these cherry options carves nicely, but the heartwood is where this material really shines.
It’ll take a little while to dry and lose moisture (a good supplier will be able to handle that part of the process for you). But once it’s been dried out it stabilizes without a lot of issues.
You won’t have to worry about your cherry soaking up moisture, swelling, cracking, and then expelling moisture only to shrink and buckle.
Takes Sanding and Finishing Well
While cherry wood has a beautiful natural color (especially the real rich, vibrant heartwood sections) it also takes sanding and finishing well.
A critical part of becoming a skilled woodcarver is knowing how to finish your projects the right way.
Cherry will require a bit of sanding (multiple grits, with wet sanding mixed in towards the end to get a really slick surface), but it isn’t going to fight you.
You’ll also have multiple finish options available. Wipe-on oil finishes are prone to “molting” – leaving behind little amber spots and specks – but spray finishes completely eliminate that problem.
You could also go with a lacquer product if you need a really solid, hard finish. Lacquered cherry is stunning!
Related: Carving Cedar Wood
3 Tips for Carving Cherry Wood
Now that we’ve gone over how comparatively easy cherry wood is to carve let’s dig a bit deeper into some tips and tricks that can help you take your projects to the next level.
Only Use Razor Sharp Tools
Like any wood carving project, you need to be sure that you are only ever using razor-sharp tools from start to finish.
Hardwood like cherry is going to do a number on your gouges, your chisels, and the rest of your carving arsenal.
You must learn how to maintain and sharpen your own tools, dialing them in as soon as they start to do so that you don’t risk tear-outs or slip-ups on your project.
Take the time to sharpen as soon as you recognize your tools are going dull, and you’ll have a lot easier time carving cherry (and other hardwoods, for that matter).
Related: How to Soften Wood for Carving
Work with Heartwood Whenever Possible
Second, it’s important that you try to carve as many of your cherry products using heartwood as possible.
Sapwood can be used in specific applications (and it’s easier to work with because it’s lighter and less dense), but it’s much more prone to cracking and splitting.
Heartwood is rock solid after it’s had time to dry and stabilize. A process that takes about 60 days from start to finish unless you’re working with thicker slabs. It’ll be stiffer to work than sapwood, but you’ll be much happier with the finished results.
Oil Finishes are Best
Oil-based finishes (like linseed and tung oil) work best with cherry.
Not only are these finishes going to maintain as much of the natural color of cherry as possible, but they’re also going to penetrate deeply – right down into the smallest wood pores.
You’ll end up with a solid, even, and reliable finish that shows off the color and grain characteristics that make cherry so special to carve in the first place!
Related: Is Poplar Good for Carving?
Cherry Wood Carving Projects
Cherry wood, with its fine grain and beautiful, rich color, is well-suited for a variety of carving projects that are both functional and decorative. Here are some project ideas that cherry wood is particularly good for:
- Relief Carvings: The fine grain of cherry is excellent for relief carving, where the image is carved into a flat panel.
- Sculptures: Cherry’s workability and beautiful aging make it a great choice for creating small to medium-sized sculptures.
- Furniture Accents: The wood’s stability and finish qualities make it ideal for detailed furniture accents like carved table legs, armrests, or decorative panels.
- Wooden Jewelry: Cherry’s fine grain allows for carving intricate designs in small pieces, such as pendants, earrings, or brooches.
- Decorative Boxes: Carved cherry wood boxes can be used for jewelry, keepsakes, or as gift boxes, taking advantage of cherry’s fine texture and color.
- Kitchen Utensils: Cherry is durable and can be used for carved spoons, forks, or serving utensils that are both decorative and functional.
- Signs and Plaques: With its ability to take fine detail, cherry is suitable for indoor signs and plaques, which can be carved with names, symbols, or intricate borders.
- Musical Instruments: Cherry wood can be used for parts of musical instruments, such as the bodies of lutes, flutes, or decorative elements on stringed instruments.
- Inlays and Marquetry: The contrasting colors between the heartwood and sapwood can be used effectively in inlay work or marquetry projects.
- Walking Sticks and Canes: The strength and workability of cherry make it suitable for creating elegant and sturdy walking sticks and canes with carved handles.
- Picture Frames: Carved cherry wood frames can add a touch of elegance and warmth to paintings, photographs, or mirrors.
- Chess Pieces: For a truly luxurious chess set, cherry wood can be carved into detailed chess pieces.
Some Closing Thoughts
All things considered, while there are certainly some wood options that are easier to carve than cherry, you’ll probably not find a hardwood that can beat it for overall workability or finish ability.
You might not want to start your woodworking adventures with a hunk of cherry wood. It’s not the most beginner-friendly material you could reach for.
That said, you don’t need years of wood carving under your belt to coax some pretty amazing projects from cherry if you use sharp tools and are deliberate with how you work the material!